Assignment 2: Make 5

For our second class in Introduction to Fabrications, we were asked to create five identical items using the tools that we learned about in our second lecture. The lessoned to gain from this concept is to form an appreciation of guides, jigs and an understanding of how to use these procedures in creating multiple version of the same item.

Since I needed to make five of something, I wanted to build an items that is usable so to avoid it simply being thrown in the trash after the class was finished.

I'm an individual that is driven to create visual media and stories and I feel that the ascetic in this form of expression is very important.  With that said, about a month ago, I went to ITP's equipment room to rent out a camera, tripod and tripod dolly to document one of my assignment.  To my surprise, our equipment room didn't have any dollies.  This made me sad, because I really like a moving shot in the scene.  It adds elegance and complexity to a shot --- something that a static shot can't always capture. Here's an example shot where a dolly is used, if you are unfamiliar with what a dolly shot might look like: https://www.youtube.com/watch?v=KSa63M5z1B8.

When I heard about this assignment, I thought this could be a great opportunity to create something that I can use for myself and then donate the other 4 to the equipment room at ITP.

I started looking online and found this amazing folding tripod dolly.

I thought to myself that this would be an easy project to replicate, but adopt slightly.

The short of the story is that  it turned out to NOT be an easy project, even with the guide from that website. It took many days of work and rethinking to pull off the five tripod dollies.  Below is my documentation of the process:

Creating the Tripod Dollies

Equipment:

Sanding belt

Sanding belt

Drill Press

Drill Press

Mitter Saw

Mitter Saw

Day 1: Cutting and Gluing

IMG_2627.jpg

Cut wood for 5 dollies

IMG_2622.jpg

gluing the feet at different levels so that the dolly can collapse for easy storage

IMG_2629-e1478650163360.jpg

Day 2: Finalizing the legs

IMG_0197.JPG.jpeg

These are the 5 tripods cut out and sanded.  I realized that each piece needs to have a small gap, as seen this in picture, so that the legs can swing out from their collapsed state.

IMG_0201.JPG.jpeg

When I added the gap between the different legs, as you can see in this image, the legs no longer line up.  I didn't take into consideration the gap when I first cut the pieces. Mistake #1 for this project.

IMG_2630.jpg

I explained my issue to a classmate, Lindsey Piscitell, and she mentioned that I should simply cut two pieces of wood that would create the gap needed between the legs when stacked and then cut the ends with the Mitter saw so that they line up.  This photo illustrates that concept.

IMG_2631.jpg

After cutting the legs, I used the drill press to drill a hole where the legs will rotate to open up into the triangle shape.

Day 3: Hardware

IMG_2637-1.jpg
IMG_2639.jpg

I couldn't find bolts that were the exact size that I needed for the dolly.  I needed 3.5" bolts and all I could find in hardware store around NYC were 3" or 4".  So I used Ben Light's tutorial on how to cut these to size.

I ended up using washers in between each leg, on the top of the dolly and on the bottom to help with the longevity of the pivoting hole.  My initial concern was that if I simply have a regular nut at the underside of the dolly, that it would become loose and the dolly wouldn't be as stabilized. I picked up some wing nuts so that the user of the dolly could tighten the pivoting joint or loosen it to collapse it. 

IMG_2644-e1478720585383.jpg

Here is mistake #2. When drilling the wheels in with a hand drill, it split the wood on the feet of the dolly

IMG_2646-1-e1478721017583.jpg

I'm not sure if this issue occurred as a result of (1) because I used Pine which apparently a wood that splits easily, or (2) becuase the wheel plate holes were too close to the edge of the foot, or (3) because I used a aggressive drill to insert these screws, or (4) because of a combination of all of the above, but I needed to troubleshoot this issue quickly because I had already spent 2 days making these.

Luckily, I only attached the wheel to one of the legs as a test, so I only had to fix one leg as a result.

IMG_2647.jpg

I traveled to a hardware store near by and picked up a smaller wheel and decided to pre drill the holes and screw them in with a hand-held screw driver to avoid the issue from above occurring again.

This ended up working really well, so I got to move on the drilling the sunken holes in the top of the dolly legs where the tripod feet would rest.

I used a Forsner bit to create the sunken holes.  I drilled one hole on each leg 1" from the end because that was the perfect length for the tripod to be stabilized on the dolly. I also drilled a second sunken hole on the legs, closer to the center so that a smaller tripod could also be used on the dolly.

IMG_2642.jpg
IMG_2643-e1478720551716.jpg

This is what the sunken holes look like on the legs

The end result

After a lot of sanding, this is what I have to show...

After a lot of sanding, this is what I have to show...

collapsed dolly

collapsed dolly

A short tripod using the shallower sunken holes

A short tripod using the shallower sunken holes

An extended tripod using the outer most sunken holes

An extended tripod using the outer most sunken holes

Animating in After Effects

Over the next couple of weeks we will be using Adobe After Effects to animate a character in a 1-3 minute animation.  I have paired up with Grant Henry to create a story around dream of a small lamp that wants to make it big in New York City.

Story idea

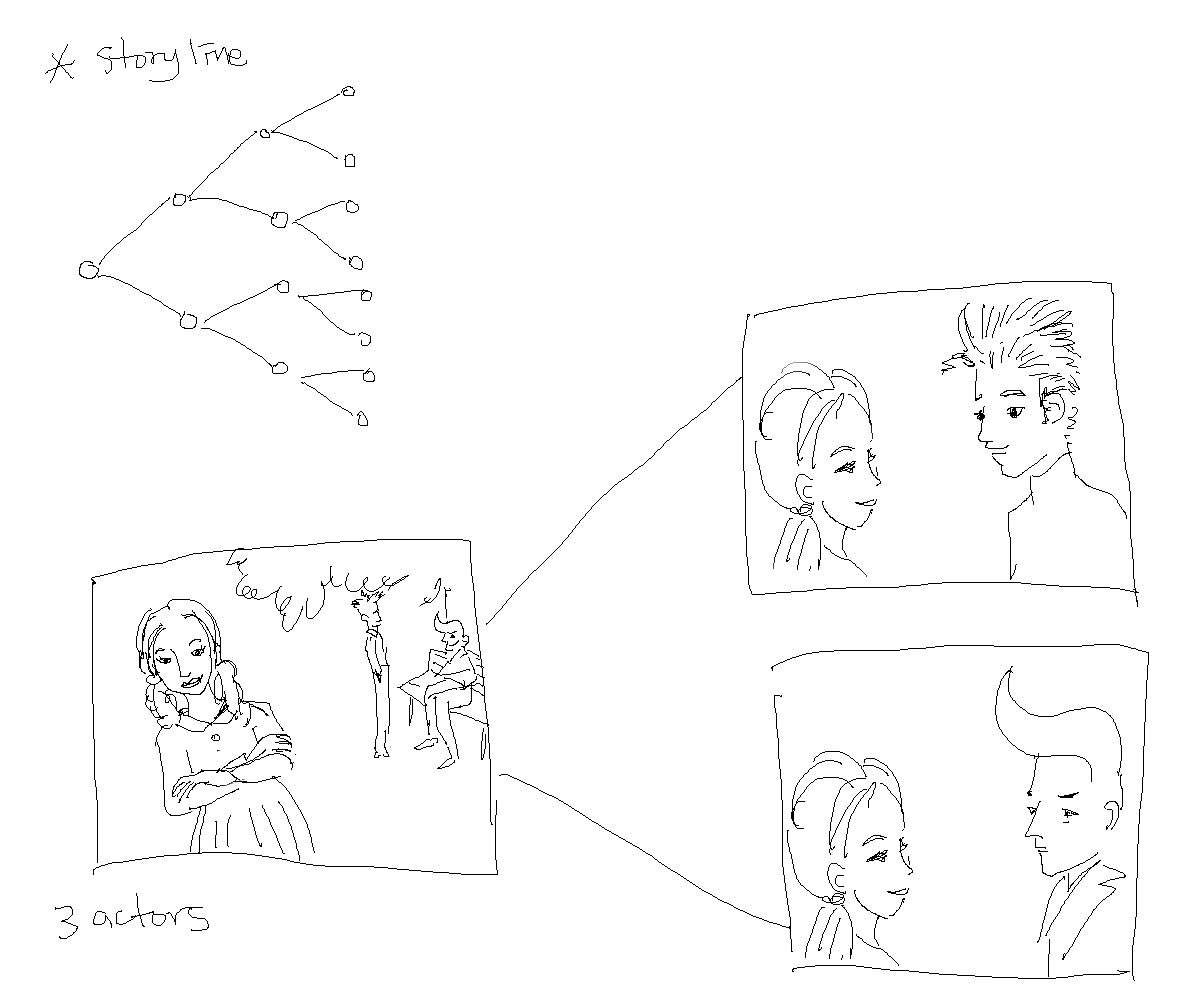
A small lamp toy, that you might find at a souvenir store, has come to New York City to try to be in a Broadway play that he has always dreamed of being in. Since he was a child we has wanted to be the lamp in the show Aladdin. He currently works in a lamp store, lives in Central Park and goes to auditions to try and make sure dream come true.  This piece is going to be shot in a documentary/interview style in Central Park where the lamp reminisces about his experiences so far...

Our initial shot ideas are listed here

Character

dude
dude

Storyboard:

new-doc-11_1.jpg
new-doc-11_2.jpg

Brightness Theremin

Since starting at ITP, I have really enjoyed creating different musical instruments.  In physical computing, I created a theremin and I was excited to try to attempt to create one in p5.js. This past week we were working with sound and video, so I felt like this was an appropriate class to work with webcam input to create a sound.  My sketch is compiled of a oscillating sound that changes the frequency when your hand gets closer to the webcam. The sketch is is ultimately using brightness to change the frequency and the background color.

As your hand gets closer to the webcam, the brightness of your hand increases the frequency. If you completely cover the webcam, allowing no light to pass, the tone stops.

I worked with Shiffman's video about a brightness mirror that detects individual pixel brightness and this sounds oscillator example in the p5.js references to create this sketch.

Here's the sketch.

And here is the code:

var video;

var vScale = 16;

var cols = 48;
var rows = 64;

var osc;
var fft;

function setup() {
 createCanvas(400,400);
 pixelDensity(1);
 video = createCapture(VIDEO);
 //video.hide();
 video.size(cols, rows);
 osc = new p5.Oscillator();
 osc.setType('sine');
 fft = new p5.FFT();
 osc.start();
}

function draw() {
 var bright = 0;
 video.loadPixels();
 for (var y = 0; y < video.height; y++) {
 for (var x = 0; x < video.width; x++) {
 var index = (video.width - x + 1 + (y * video.width)) * 4;
 var r = video.pixels[index + 0];
 var g = video.pixels[index + 1];
 var b = video.pixels[index + 2];
 if (r && b && g) {
 bright += ((r + g + b) / 3);
 }
 }
 }

 bright /= (cols * rows);
 background(bright/2, bright, 255 * log(bright));
 osc.freq(bright * 3);

var waveform = fft.waveform(); // analyze the waveform
 beginShape();
 strokeWeight(3);
 for (var i = 0; i < waveform.length; i+=100) {
 var w = map(i, 0, waveform.length, 0, width);
 var z = map(waveform[i], -1, 1, height, 0);
 vertex(w, z);
 ellipse(w, z, 20);
 }
 endShape();
}